Soft & Tender Sourdough Sandwich Bread
Sourdough sandwich bread is an everyday loaf designed to be soft, tender, flavorful, and sturdy enough for all your favorite sandwiches. Unlike a rustic sourdough boule with a thick crust and chewy interior, this loaf has a fine, even crumb and a soft crust that makes it ideal for slicing.
Made entirely with natural sourdough fermentation and enriched with milk, butter, and a touch of honey or sugar, this bread has a gentle tang, subtle sweetness, and wonderfully tender texture. It holds up beautifully to peanut butter and jam, deli meats, eggs, grilled cheese, and more.
Whether you are new to sourdough baking or simply want a dependable homemade alternative to store-bought bread, this recipe is practical, versatile, and easy to make part of your weekly baking routine.
Why I Love This Recipe
There are plenty of reasons this sourdough sandwich bread deserves a regular place in your kitchen:
- Soft and tender: Milk and butter create a delicate crumb without making the bread heavy.
- Perfect for sandwiches: The slices are flexible and sturdy enough to hold generous fillings.
- Naturally leavened: The recipe relies entirely on active sourdough starter rather than commercial yeast.
- Mild sourdough flavor: You get the pleasant tang of sourdough without an overpowering sour taste.
- Great everyday loaf: Its predictable shape and even crumb make it ideal for toast, sandwiches, breakfast, and snacks.
- Freezer-friendly: Slice the loaf before freezing so you can enjoy individual pieces whenever needed.
What Makes Sourdough Sandwich Bread Different?
Traditional sourdough boules are usually made with an emphasis on a crisp crust, chewy texture, and open crumb. Sandwich bread has a different purpose. It needs to be soft, evenly textured, easy to slice, and sturdy enough to hold fillings.
This recipe achieves that texture by combining:
- Milk for richness and tenderness
- Butter or neutral oil for softness
- Honey or sugar for subtle sweetness and a tender crumb
- A loaf pan for a consistent shape
- Active sourdough starter for natural fermentation and flavor
The result is a loaf with a soft interior, tender crust, balanced flavor, and slices that hold together beautifully.
Ingredients
For the Dough
- 100 g active sourdough starter, fed and bubbly
- 300 g slightly warm milk, preferably whole milk
- 30 g honey or sugar
- 30 g melted and cooled butter, or neutral oil
- 9 g salt
- 500 g bread flour or unbleached all-purpose flour
Optional Additions
- 1–2 tablespoons milk powder for additional softness
- 25–50 g whole wheat flour, replacing the same amount of white flour
- 1 tablespoon olive oil for extra tenderness
Equipment
- Large mixing bowl
- Kitchen scale
- 9 × 5-inch (23 × 13 cm) loaf pan
- Clean kitchen towel or plastic wrap
- Oven
- Cooling rack
How to Make Sourdough Sandwich Bread
1. Prepare the Sourdough Starter
For this recipe, use an active sourdough starter rather than discard.
Feed your starter approximately 4–6 hours before mixing the dough, using a 1:2:2 or 1:3:3 starter-to-flour-to-water ratio.
The starter should be:
- Doubled or tripled in volume
- Bubbly and well aerated
- Slightly domed on top
- Pleasantly tangy rather than sharply acidic or alcoholic-smelling
An active starter is important because it provides the natural leavening needed to properly rise the dough.
2. Mix the Dough
Add the active sourdough starter, warm milk, honey or sugar, and melted cooled butter to a large mixing bowl. Stir until the mixture is mostly combined.
Add the flour and salt. Mix with a spoon or your hands until no dry flour remains and a soft, shaggy dough forms.
The dough should feel soft and slightly tacky without being soupy.
Cover the bowl and allow the dough to rest for 20–30 minutes. This short resting period gives the flour time to hydrate and makes the dough easier to develop.
3. Knead Until Smooth
After the resting period, knead the dough until it becomes smooth and elastic.
By hand: Knead on a lightly floured surface for approximately 8–10 minutes.
Using a stand mixer: Knead with a dough hook on medium speed for about 5–6 minutes.
The finished dough should have a smooth surface, an elastic texture, and slight tackiness. When gently pressed, it should gradually spring back.
If the dough initially feels too wet, avoid immediately adding large amounts of flour. Let it rest for about 10 minutes before continuing to knead. Gluten development will naturally strengthen the dough.
4. Bulk Fermentation
Shape the dough into a ball and place it in a lightly oiled bowl. Cover and allow it to ferment at room temperature until approximately doubled in size.
Bulk fermentation generally takes about 4–6 hours, although the exact time depends on your starter, room temperature, and dough temperature.
A dough temperature around 75–78°F (24–26°C) is ideal.
For additional structure, you can perform one stretch-and-fold halfway through the bulk fermentation.
The dough is generally ready when:
- It has noticeably increased in volume
- The surface looks smoother
- The top appears slightly domed
- The dough gently jiggles when the bowl is moved
- A gentle finger press leaves an indentation that slowly begins to fill
5. Shape the Loaf
Transfer the fermented dough to a lightly floured work surface.
Gently press it into a rectangle approximately the width of your loaf pan.
Fold the top third toward the center and then fold the bottom third upward, similar to folding a letter. Roll the dough tightly from one short end to the other to create a neat log.
Pinch the seam closed and place the shaped dough seam-side down into a greased 9 × 5-inch loaf pan.
Creating enough surface tension during shaping helps the loaf maintain its structure and encourages an even crumb.
6. Complete the Final Proof
Cover the loaf pan and allow the dough to rise at room temperature until the dough reaches approximately 1 inch (2–3 cm) above the rim of the pan.
This usually takes around 2–4 hours, depending on the temperature and activity of your starter.
The dough should slowly spring back when gently pressed.
Avoid rushing the final proof. An underproofed loaf can turn out dense and may tear when sliced.
For an overnight option, refrigerate the dough once it has risen approximately 50–70%. The following day, it can be baked directly from the refrigerator.
7. Bake the Bread
Preheat your oven to 375°F (190°C).
Place the loaf on the center rack and bake for 40–45 minutes.
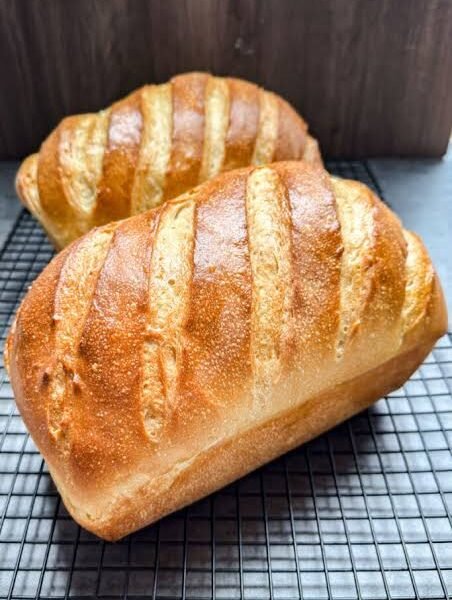
The bread should be golden brown on top and sound hollow when gently tapped. For the most reliable result, check that the internal temperature reaches approximately 200°F (93°C).
If the top begins browning too quickly, loosely cover the loaf with foil during the final 10 minutes of baking.
8. Cool Before Slicing
Remove the finished bread from the pan and transfer it to a cooling rack.
Allow it to cool for at least 1 hour before slicing.
Although it may be tempting to cut into a warm loaf immediately, allowing it to cool gives the crumb time to finish setting. Slicing too soon can result in a gummy texture and uneven slices.
What to Expect From This Bread
Texture
This loaf has a fine, even crumb that is soft enough for everyday eating while remaining sturdy enough for sandwiches. The slices are flexible rather than crumbly, with a tender crust that is easy to bite through.
Flavor
The flavor is gently tangy from the sourdough starter, balanced by the mild sweetness of honey or sugar. Milk and butter add richness without making the bread feel heavy.
Tips & Tricks for Success
Use an Active Starter
The strength of your sourdough starter has a major effect on fermentation. Make sure it is bubbly, active, and near its peak before mixing the dough.
Watch the Dough, Not Just the Clock
Fermentation times can vary considerably depending on temperature and starter activity. Look for changes in volume, texture, and elasticity rather than relying solely on the suggested times.
Avoid Adding Too Much Flour
Slightly tacky dough can become easier to handle as gluten develops. Adding excessive flour during kneading can make the finished loaf dense and dry.
Shape With Good Tension
A firm, even roll helps the loaf rise upward instead of spreading and contributes to a more uniform crumb.